
Use a media repository
- Applies to:
- MindTouch (current)
- Role required:
- Editor
A media repository is an optional method for image and file management.
The media repository approach allows you to reuse files or images throughout your site and update reused media in one location.
Set up a media repository
There are two ways to set up a media repository:
- Create a media repository page: Works on any CXone Expert site.
- Import a media repository page: Works for some older sites created before November 2017 that show Options > Import here in the product toolbar.
Option 1: Create a media repository page
- Navigate to the desired Category level location for your media repository.
- From the product toolbar, click New > Category.
- Select the Create live radio button.
- Click Create.
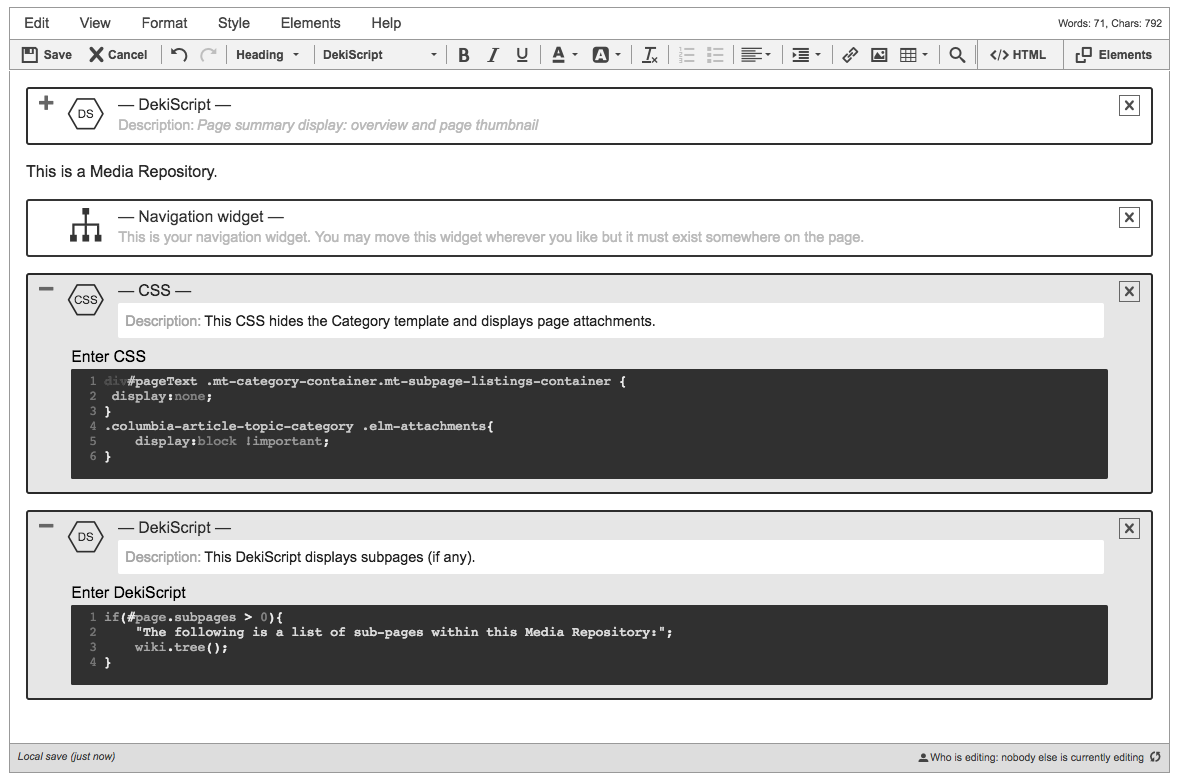
- In the Page Title field, enter "Media Repository".
- In the top right corner of the first DekiScript container ("Description: Search field"), click the X to remove it from the page.
- On a new empty line, click Style > CSS from the editor toolbar and enter the following code:
div#pageText .mt-category-container.mt-subpage-listings-container { display:none; } .columbia-article-topic-category .elm-attachments{ display:block !important; } - On a new empty line, click Style > DekiScript from the editor toolbar and enter the following code:
if(#page.subpages > 0){
    "The following is a list of sub-pages within this Media Repository:";
    wiki.tree();
}
- Click Save.
- Set the Page Privacy to Semi-Private.
- If using sub-pages in your media repository Category, select Apply changes to all to sub-pages and Overwrite all permissions on sub-pages to the settings on this page.
Option 2: Import a media repository page
To confirm you can use the import method, check the product toolbar for Options > Import here. If you do not see the Import here option, follow the steps above to create a media repository page instead.
- Download the media repository MTARC file.
- Navigate to the desired Category level location for your media repository.
- From the product toolbar, click Options > Import here.
- Find your media repository MTARC and select it to import.
- Set the Page Privacy to Semi-Private.
- If using sub-pages in your media repository Category, select Apply changes to all to sub-pages and Overwrite all permissions on sub-pages to the settings on this page.
Media repository tips
- Although a media repository approach allows you to update reused media in one location, there is no mechanism to automatically see where files or images are reused throughout your site.
- Consider adding a media repository page to top-level Category pages to organize media for each Category.
- CXone Expert pages, including media repository pages, can only display up to 1,000 file attachments. Attachment properties can load slowly if there are too many files attached to one page. To stay below the attachment limit and avoid slow loading for properties, you can create sub-pages within a media repository to limit the number of attachments on each page.
Add files from media repository to your pages
- Open the page into which you want to insert a file or image in Edit mode.
- In the editor toolbar, click the Image icon.
- Browse to your media repository or search by the file's name.
- Click Save image.