
Article permissions indicator
- Applies to:
- MindTouch (current)
- Role required:
- Admin
Create and implement an article permissions requirement indicator for your Expert articles using the content side template.
What is an article permissions requirement indicator?
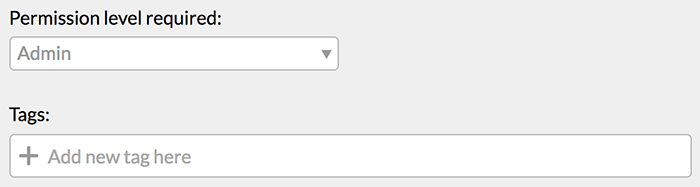
An article permission indicator is a small container located above the table of contents (TOC) that displays the permission level required to complete the instructions written in that article. By displaying what permissions level your readers need before they read an article, you save them time and prevent frustration.
Prerequisites
- Admin access to Expert
- Know how to create custom classifications
- Know how to create or modify a custom content template
- Know how to add site-wide CSS to the control panel
Create a custom classification for your permission level requirement
- On the Expert toolbar, navigate to Site tools > Control panel.
- In the control panel, select Systems Settings > Classifications.
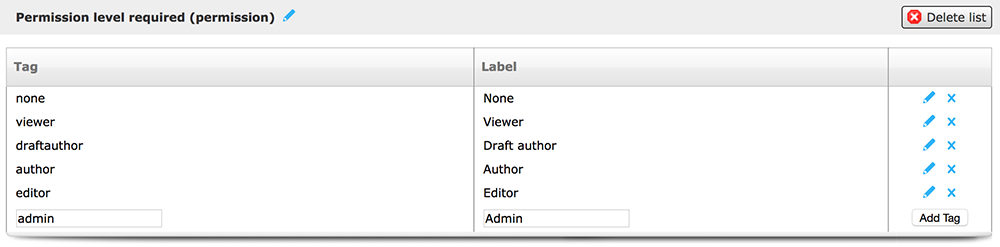
- Add a custom classification for your article permission requirements.

- Scroll down to your new permission classification and add each of the following permission levels. You may want to add permission levels in order from lowest to highest to make it easier to select them in page settings.
- None
- Viewer
- Draft author
- Author
- Editor
- Admin
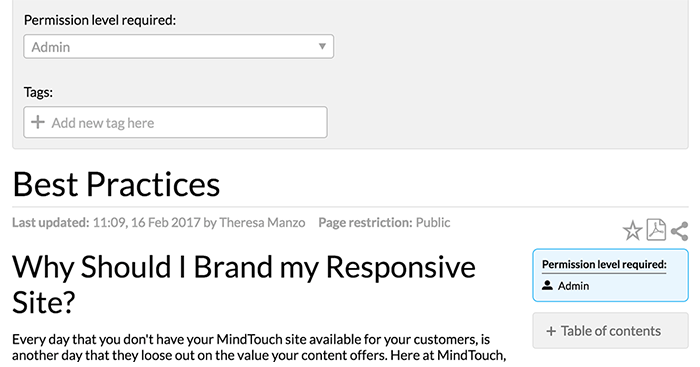
- Now that you've added the new permission level classification and its options, you can navigate to any article where you'd like to display the indicator and assign a permission level to it in page settings.
Add the permissions requirement code to your content side template
- Copy and paste the following code into your custom content header template located at
/Template:Custom/Views/ContentSide.
// Define which article types you don't want this to appear on
var articleType = page.article;
var types = [ 'topic-category', 'topic-guide' ];
var found = true;
foreach(var type in types) {
if(articleType === type) {
found = false;
}
}
// Look through the page's tag list, find the one for 'permission', display the bar with the correct version information
var tagList = map.keyvalues(page.tags);
foreach(var tag in tagList where string.contains(tag.key, 'permission:')) {
var permission = string.replace(tag.value.name, 'permission:', '', true);
var permissionLabel = string.toupperfirst(permission);
if(permission && found) {
<div class="mt-permission-indicator">
<span class="mt-permission-indicator-label"> 'Permission level required: ' </span>
<span class="mt-permission-indicator-value"> permissionLabel </span>
</div>
}
}
- Save your page.
Add custom CSS to your control panel
- On the Expert toolbar, navigate to Site tools > Control panel.
- In the control panel, select Branding > Custom Site CSS.
- In the All Roles CSS text field, add the following CSS:
/* permission requirement indicator */
.mt-content-side {
    clear: both;
    @media all and (min-width: 18.75em) {
        float: left;
    }
    @media all and (min-width: 37.5em) {
        float: right;
    }
}
.mt-permission-indicator {
    border-radius: @border-radius-lsf;
    .mt-highlight-container;
    clear: none;
    display: block;
    float: right;
    font-size: 80%;
    margin: 0 0 1em 1em;
    overflow: hidden;
    padding: .8em;
    width: 12.75em;
    @media all and (min-width: 18.75em) {
        margin: 0 0 1em;
    }
    @media all and (min-width: 37.5em) {
        margin: 0 0 1em 1em;
    }
}
.mt-permission-indicator-label {
    border-bottom: 1px solid @tertiary-font-color;
    display: inline-block;
    font-weight: bold;
    margin-bottom: .5em;
    padding-bottom: .25em;
}
.mt-permission-indicator-value {
    clear: both;
}
.mt-permission-indicator-value:before {
    content: '\e675';
    .icon-font-declaration;
    margin-right: .5em;
}
- Click Save.
Verify your article permission requirement indicator works
Navigate to your article with a permission level already assigned and you should see your new article permission requirement indicator.